As a Magento eCommerce store owner, it is crucial for you to apply different rules, discounts or tax rates to only a selected few users. If you are looking for an answer to this question, this is the right blog for you.

In the forthcoming sections of this write-up, we will divert our attention to the different customer groups employed in Magento and the way to use them. We promise after reading this piece of content; you will have a fair idea about Magento 2 customer groups configuration. This will, in turn, help you to effectively utilize Magento development services to take your eCommerce store to the new heights of success.
The very first thing that one needs to learn when it comes to Magento 2 customer groups configuration is the definition of customer groups in Magento 2. Let’s try to decode the meaning. In layman’s terms, it is a functionality by Magento that assists with store customization and user experience. As a store owner, your job is to assign your customers to different customer groups to ascertain the available discounts and tax classes related to those groups.
The real reason behind store owners to use this is to get more control over the content being displayed to your customers. It also assists you in automating the process by assigning them to the requisite groups that you wish. The most critical aspect is to differentiate between your B2C (retail) and B2B (wholesale) customers.
What Can Store Owners Do With Different Customer Groups?
With the help of different customer groups, store owners can customize product discounts and tax classes for your users. But, these are simply the default options. You can always extend these options by integrating new behavior to your groups.
It is possible to do several things with the customer groups, in case you extend their functionality. A prime example of this is restricting specific products or even whole categories for one particular customer group. Alternatively, you can also enable a single customer group to see one specific category.
On top of this, you can even integrate custom error messages, redirects, or also employ different shipping and payment methods for a specific group of customers. In simple terms, you can do pretty much anything related to a specific set of users.
There are different things that you can do, and your customers will thank you for that. The reason being, it will assist in providing a seamless customer experience. It is all about creating a win-win situation.
Making the Necessary Amendments in the Magento 2 Default Customer Groups
Before we look at the steps, it is important to divert our attention to the basic setup and usage. Magento 2 consists of four default customer groups: General, Not Logged In, Retailer, and Wholesale. Whenever a new customer registers on the online store, they will automatically be added to the default group. We call it “General”. In case you wish to change the default group assigned to newly registered customers, it is possible to do that through the admin panel. Follow the steps given below:
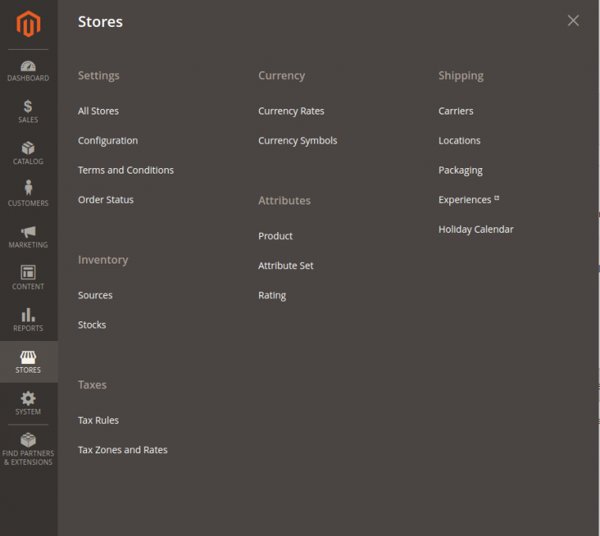
- Click Stores -> Configuration

Source: inchoo.net
- Under “Customers” select “Customer Configuration”.
- Under “Create New Account Options” search for “Default Group”. This is the place from which you can change the value. The group you opt there (provided that the “Enable Automatic Assignment to Customer Group” option is set to Yes) will be the default group assigned to every new customer.

Source: inchoo.net
- On top of default groups, it is possible to create your groups with custom options.
Steps to Add New Customer Group
If you are using the latest version of Magento 2, i.e., Magento 2.3, it is a very straightforward and easy way to add a new customer. Let’s go through the steps.
- On the admin sidebar click Customers -> Customer Groups. This is the place where you can see four default groups that you can edit or delete.
- Click “Add New Customer Group”. This is the place where you need to put in the group name and select a tax class.
- Click on “Save Customer Group”.
- Voila! You will have your very own customer group ready…
Assigning Customers to Customer Groups

Source: inchoo.net
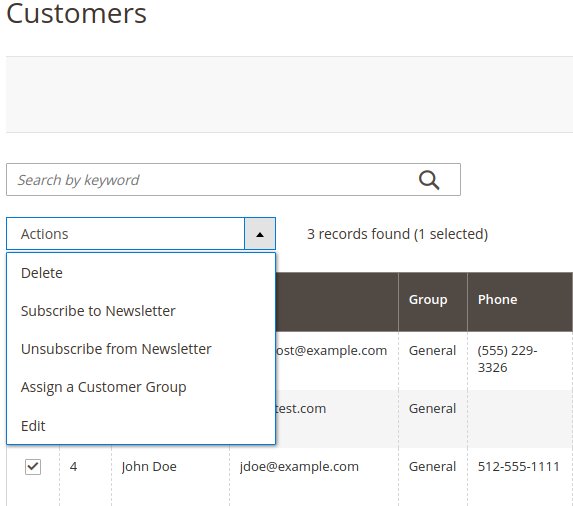
It is possible to assign every registered customer to a customer group with the help of the admin panel. To do that, click “Customer > All Customers”. Search for the customer to be assigned to a group. Mark the checkbox in the first column.
Click “Actions” and select “Assign a Customer Group”. You will get an option to choose between available customer groups (remember, this list will not have those who are not logged in. To select users who are not logged in you need to opt for “Not Logged In”.)
Definition of Group Pricing
Group pricing is a Magento feature that enables you to set a discounted price on any product. It is even possible for you to extend the discount to members of a specific customer group. You can also use this functionality for multiple groups. This is where customer groups can go a long way during promotions, for example.
Steps to Set Group Price on a Product

Source: inchoo.net
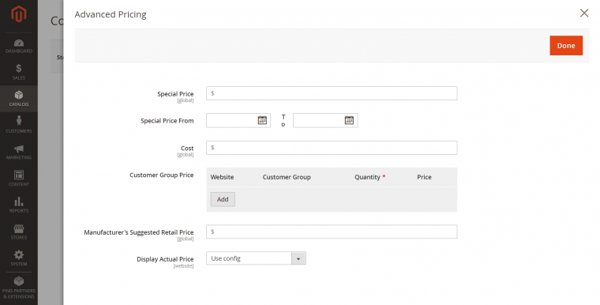
- Open the product in edit mode in the admin panel. Under the “Price” field, you will see “Advanced Pricing”.
- Next, click “Add” in the “Customer Group Price” section.
- You will see multiple fields there which can be customized.
- Select a website, customer group, quantity, and price (Fixed or Discount).
- Once you get over these steps, hit “done”.
You will have a product with a special price for logged in users that belong to the group that you defined in the earlier steps.
The Finale
These are certain things that you can do with Magento 2 customer group’s configuration. So, here you have it everything that you can do as a store owner with the help of customer group configurations in Magento 2. To take advantage of these features, we recommend you to affiliate with a reputed Magento development companyat the earliest!
Author Bio:
Harshal Shah has countless experiences in the field of Information Technology. Also, he is the CEO of Elsner Technologies Pvt Ltd. Magento development company that offers various Magento development services to clients across the globe. Mr. Harshal is a huge tech enthusiastic person who has written major & genuine articles as well as blogs on topics that are relevant to various CMS platforms.

Nice Article! Thanks for sharing such amazing information
Cool! it really looks clear, thanks
Thank you for providing these steps which are very helpful in doing Magento of our business.